Spring Cloud AWS
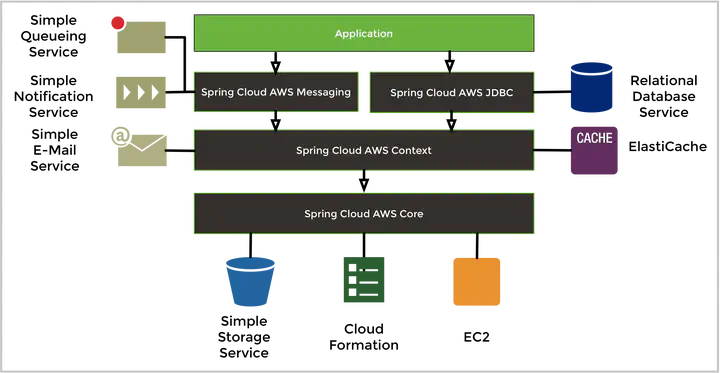 Photo by https://spring.io/
Overview
This project will take you through a step by step guide to building and deploying a simple Java app in the AWS cloud. The app will use a few well known AWS services which I’ll describe along the way. There is quite a bit to cover here so the overview of the AWS services will be light. For those interested in finding out more I’ll link to the appropriate section of the AWS documentation.
I have broken down the projects into sub-projects in order to keep them easier to read.
- This post will focus on building the demo application.
- In the second part we’ll look at configuring the various services on AWS, running the application locally and then deploying it in the cloud.
- In the third part we will do the same thing but via cloudformation.
What will the sample application look like
The app we’re going to build is a simple user management app and will consist of a Spring Boot REST layer and an Thymeleaf Front end. We’ll deploy the application to AWS and make use of the following services.
- EC2 – Amazons Elastic Cloud Compute provides on demand virtual server instances that can be quickly provisioned with the operating system and software stack of your choice. We’ll be using Amazons own Linux machine image to deploy our application.
- RDS – Amazons database as a service allows developers to provision Amazon managed database instances in the cloud. A number of common database platforms are supported but we’ll be using a MySQL instance.
- S3 – Amazons Simple Storage Service provides simple key value data storage which we’ll be using to store image files.
We’re going to build a simple CRUD style user management app to create, view and delete user details. Below is a high level overview of each of the screens and how they interact with other components.
View all users – A Thymeleaf view will issue a GET request for all uses to a Spring Boot managed endpoint. Users will be displayed in a simple table and users will have the ability to edit or delete user rows. The endpoint will retrieve all user data from the MySQL database instance on RDS and return it to the client. Images will be referenced from S3 in the same way as the Edit User screen.

Create user – A Thymeleaf view will capture and post user data to a Spring Boot managed endpoint. When a user is added the endpoint will save the user data to a MySQL database instance on RDS. The user image will be saved to S3 storage which will generate a unique key and a public URL to the image. The key and public URL will be saved in the database as part of the user data.

Edit user – A Thymeleaf view will issue a POST request to an endpoint for a specific user. The endpoint will retrieve user data from the MySQL database instance on RDS and return it to the client. The response data will include a publicly accessible URL which will be used to reference the user image directly from S3 storage.

Delete User - A Thymeleaf modal view will issue a DELETE request to an endpoint for a specific user. The endpoint will delete user data from the MySQL database instance on RDS along with also the image hosted in S3 and return it to the client.

Source Code
The full source code for this tutorial is available on github at springboot-aws-starter. You may find it useful to pull the code locally so that you can experiment with it as you work through the tutorial.
Application Structure

In the sections that follow we’ll look at some of the most important components in detail. The focus of this post isn’t Spring Boot so I wont describe every class in detail. We’ll focus more on AWS integration and making our app cloud ready.
Dependencies
We start with Spring Initializer and add the following dependencies.
- spring-cloud-starter-aws: adds the core module of Spring Cloud AWS which adds the
spring-cloud-aws-contextandspring-cloud-aws-autoconfiguredependencies. - spring-cloud-starter-aws-jdbc: adds the configuration for the RDS usage.
More details here: Spring Cloud AWS
pom.xml
<?xml version="1.0" encoding="UTF-8"?>
<project xmlns="http://maven.apache.org/POM/4.0.0"
	xmlns:xsi="http://www.w3.org/2001/XMLSchema-instance"
	xsi:schemaLocation="http://maven.apache.org/POM/4.0.0 https://maven.apache.org/xsd/maven-4.0.0.xsd">
	<modelVersion>4.0.0</modelVersion>
	<parent>
		<groupId>org.springframework.boot</groupId>
		<artifactId>spring-boot-starter-parent</artifactId>
		<version>2.1.14.RELEASE</version>
		<relativePath /> <!-- lookup parent from repository -->
	</parent>
	<groupId>com.example.aws</groupId>
	<artifactId>springboot-aws-starter</artifactId>
	<version>0.0.1-SNAPSHOT</version>
	<name>springboot-aws-starter</name>
	<description>Demo project for Spring Boot AWS</description>

	<properties>
		<java.version>1.8</java.version>
		<spring-cloud.version>Greenwich.SR5</spring-cloud.version>
	</properties>

	<dependencies>
		<dependency>
			<groupId>org.springframework.boot</groupId>
			<artifactId>spring-boot-starter-data-jpa</artifactId>
		</dependency>
		<dependency>
			<groupId>org.springframework.boot</groupId>
			<artifactId>spring-boot-starter-thymeleaf</artifactId>
		</dependency>
		<dependency>
			<groupId>nz.net.ultraq.thymeleaf</groupId>
			<artifactId>thymeleaf-layout-dialect</artifactId>
		</dependency>
		<dependency>
			<groupId>org.springframework.boot</groupId>
			<artifactId>spring-boot-starter-web</artifactId>
		</dependency>
		<dependency>
			<groupId>mysql</groupId>
			<artifactId>mysql-connector-java</artifactId>
			<scope>runtime</scope>
		</dependency>
		<dependency>
			<groupId>org.springframework.cloud</groupId>
			<artifactId>spring-cloud-starter-aws</artifactId>
		</dependency>
		<dependency>
			<groupId>org.springframework.cloud</groupId>
			<artifactId>spring-cloud-starter-aws-jdbc</artifactId>
		</dependency>

		<dependency>
			<groupId>org.projectlombok</groupId>
			<artifactId>lombok</artifactId>
			<optional>true</optional>
		</dependency>
		<dependency>
			<groupId>org.springframework.boot</groupId>
			<artifactId>spring-boot-starter-test</artifactId>
			<scope>test</scope>
		</dependency>

	</dependencies>

	<dependencyManagement>
		<dependencies>
			<dependency>
				<groupId>org.springframework.cloud</groupId>
				<artifactId>spring-cloud-dependencies</artifactId>
				<version>${spring-cloud.version}</version>
				<type>pom</type>
				<scope>import</scope>
			</dependency>
		</dependencies>
	</dependencyManagement>

	<build>
		<plugins>
			<plugin>
				<groupId>org.springframework.boot</groupId>
				<artifactId>spring-boot-maven-plugin</artifactId>
				<configuration>
					<finalName>springboot-aws-starter</finalName>
					<executable>true</executable>
				</configuration>
			</plugin>
		</plugins>
	</build>

</project>
Domain Model
The domain model for the demo app is very simple and consist of just 3 entities – a User, Address and UserImage.
User.java
@Entity // This tells Hibernate to make a table out of this class
@Table(name = "user")
@JsonIgnoreProperties(ignoreUnknown = true)
public class User {

	@Id
	@Getter
    @GeneratedValue(strategy = GenerationType.IDENTITY)
	private long id;

	@Setter
	@Getter
	@Column(name = "first_name")
	private String firstName;

	@Setter
	@Getter
	@Column(name = "last_name")
	private String lastName;

	@Setter
	@Getter
	@Column(name = "email")
	private String email;

	@Setter
	@Getter
	@Column(name = "date_of_birth")
	private Date dateOfBirth;

	@Setter
	@Getter
	@OneToOne(cascade = { CascadeType.ALL })
	private UserImage userImage;

	@Setter
	@Getter
	@OneToOne(cascade = { CascadeType.ALL })
	private Address address;

	public User() {
	}

	public User(String firstName, String lastName, String email, Date dateOfBirth,
			UserImage userImage, Address address) {
		this.firstName = firstName;
		this.lastName = lastName;
		this.email = email;
		this.dateOfBirth = dateOfBirth;
		this.userImage = userImage;
		this.address = address;
	}

	@Override
	public String toString() {
		return "User [firstName=" + firstName + ", lastName=" + lastName + "]";
	}
}
Address.java
@Entity(name="address")
public class Address {

	@Id
	@Getter
    @GeneratedValue(strategy = GenerationType.IDENTITY)
    private long id;

	@Setter
	@Getter
	@Column(name = "street", nullable = false, length=40)
	private String street;

	@Setter
	@Getter
	@Column(name = "city", nullable = false, length=40)
	private String city;

	@Setter
	@Getter
	@Column(name = "county", nullable = false, length=40)
	private String county;

	@Setter
	@Getter
	@Column(name = "postcode", nullable = false, length=40)
	private String postcode;

	public Address(String street, String city, String county, String postCode) {
		this.street = street;
		this.city = city;
		this.county = county;
		this.postcode = postCode;
	}

	public Address() {
		super();
	}
}
UserImage.java
@Entity(name="user_image")
public class UserImage {

	@Id
	@Getter
    @GeneratedValue(strategy = GenerationType.IDENTITY)
    private long id;

	@Setter
	@Getter
	@Column(name = "s3_key", nullable = false, length=200)
	private String key;

	@Setter
	@Getter
	@Column(name = "url", nullable = false, length=2000)
	private String url;

	public UserImage(String key, String url) {
		super();
		this.key = key;
		this.url = url;
	}

	public UserImage() {
		super();
	}
}
Domain Controller
The SpringbootAwsStarterController exposes endpoints for creating, retrieving and deleting users and is called from a Thymeleaf views that we’ll create later.
SpringbootAwsStarterController.java
@Controller
public class SpringbootAwsStarterController {

	private final Logger log = LoggerFactory.getLogger(getClass());

	@Autowired
	private SpringbootAwsStarterService service;

	@RequestMapping(method = RequestMethod.GET, path = "/user-form")
	public String showAddUserForm(Model model) {
		model.addAttribute("userDto", new UserDto());
		return "add-user";
	}

	@RequestMapping(value = "/add-user", method = RequestMethod.POST)
	public String addUser(@Valid @ModelAttribute("userDto") UserDto userDto, BindingResult result,
			HttpServletRequest request, Model model) throws IOException, ParseException {
		if (result.hasErrors()) {
			model.addAttribute("userDto", userDto);
			return "add-user";
		}

		User createdUser = service.create(userDto.getFirstName(), userDto.getLastName(), userDto.getEmail(),
				userDto.getDateOfBirth(), userDto.getStreet(), userDto.getCity(), userDto.getCounty(),
				userDto.getPostcode(), userDto.getImage());
		if (createdUser != null) {
			log.info("user created: " + createdUser.toString());
			List<User> users = service.findUsers(null);
			model.addAttribute("users", users);
		}
		return "users";
	}

	@RequestMapping(method = RequestMethod.GET, produces = MediaType.APPLICATION_JSON_VALUE, path = { "/users", "/" })
	public String loadUsers(Model model) {

		List<User> users = service.findUsers(null);
		model.addAttribute("users", users);
		return "users";
	}

	@RequestMapping(method = RequestMethod.GET, path = "/get-user/{id}")
	public String getUserById(Model model, @PathVariable Long id) {

		User user = service.findUsers(id).get(0);

		DateFormat df = new SimpleDateFormat("yyyy-MM-dd");
		String birthDate = df.format(user.getDateOfBirth());

		UserDto userDto = new UserDto(user.getId(), user.getFirstName(), user.getLastName(),
				user.getEmail(), birthDate, null, user.getUserImage().getUrl(), user.getAddress().getStreet(), user.getAddress().getCity(),
				user.getAddress().getCounty(), user.getAddress().getPostcode());

		model.addAttribute("userDto", userDto);

		return "edit-user";
	}

	@RequestMapping(method = RequestMethod.POST, path = "/edit-user")
	public String editUser(@Valid @ModelAttribute("userDto") UserDto userDto, BindingResult result, Model model) throws ParseException {

		if (result.hasErrors()) {
			model.addAttribute("userDto", userDto);
			return "edit-user";
		}

		User updatedUser = service.update(userDto.getId(),userDto.getFirstName(), userDto.getLastName(), userDto.getEmail(),
				userDto.getDateOfBirth(), userDto.getStreet(), userDto.getCity(), userDto.getCounty(),
				userDto.getPostcode());
		if (updatedUser != null) {
			log.info("user updated: " + updatedUser.toString());
			List<User> users = service.findUsers(null);
			model.addAttribute("users", users);
		}
		return "users";
	}

	@RequestMapping(method = RequestMethod.GET, produces = MediaType.APPLICATION_JSON_VALUE, path = "/delete-user/{id}")
	public String deleteUser(Model model, @PathVariable Long id) {

		Long deletedId = service.delete(id);

		if (deletedId != null) {
			log.info("user deleted: " + deletedId);
			List<User> users = service.findUsers(null);
			model.addAttribute("users", users);
		}
		return "users";
	}
}
Service Layer
SpringbootAwsStarterServiceImpl.java
@Service
public class SpringbootAwsStarterServiceImpl implements SpringbootAwsStarterService {

	private final Logger log = LoggerFactory.getLogger(getClass());

	@Autowired
	private SpringbootAwsStarterRepository repository;

	@Autowired
	private SpringCloudS3Service springCloudS3Service;

	@Override
	public List<User> findUsers(Long id) {
		List<User> users = new ArrayList<User>();

		if (id != null) {
			User userById = repository.findById(id).get();
			if (userById == null) {
				throw new HttpClientErrorException(HttpStatus.NOT_FOUND, "user does not exist");
			} else {
				users.add(userById);
			}
		} else {
			for (User user : repository.findAll()) {
				users.add(user);
			}
		}
		return users;
	}

	@Override
	public Long delete(Long id) {
		User existing = repository.findById(id).get();

		if (existing == null) {
			log.info("user does not exist: " + id);
			throw new HttpClientErrorException(HttpStatus.NOT_FOUND, "user does not exist");
		} else {
			springCloudS3Service.deleteImageFromS3(existing.getUserImage());
			repository.delete(existing);
			log.info("deleted user: {}", id);
			return id;
		}
	}

	@Override
	public User create(String firstName, String lastName, String email, String dateOfBirth, String street, String city,
			String county, String postcode, MultipartFile image) throws ParseException {
		UserImage userImage = springCloudS3Service.saveFileToS3(image);
		SimpleDateFormat df = new SimpleDateFormat("yyyy-MM-dd");
		Date birthDate = df.parse(dateOfBirth);

		User user = new User(firstName, lastName, email, birthDate, userImage,
				new Address(street, city, county, postcode));
		return repository.save(user);
	}

	@Override
	public User update(Long id,String firstName, String lastName, String email, String dateOfBirth, String street, String city,
			String county, String postcode) throws ParseException {
		User existing = repository.findById(id).get();

		if (existing == null) {
			log.info("user does not exist: " + firstName);
			throw new HttpClientErrorException(HttpStatus.NOT_FOUND, "user does not exist");
		} else {

			existing.setFirstName(firstName);
			existing.setLastName(lastName);
			existing.setEmail(email);
			SimpleDateFormat df = new SimpleDateFormat("yyyy-MM-dd");
			Date birthDate = df.parse(dateOfBirth);
			existing.setDateOfBirth(birthDate);
			Address updatedAddress = new Address(street, city, county, postcode);
			existing.setAddress(updatedAddress);

			log.info("user updated: {}", existing.toString());
			return repository.save(existing);
		}
	}

}
SpringCloudS3Service.java
@Component
public class SpringCloudS3Service {

	private static final Logger logger = LoggerFactory.getLogger(SpringCloudS3Service.class);

	private static final String S3_BUCKET_NAME = "springboot-aws-starter-s3";

	@Autowired
	private AmazonS3Client amazonS3;

	@Autowired
	SpringCloudS3 springCloudS3;

	/**
	 * Save image to S3 and return CustomerImage containing key and public URL
	 *
	 * @param multipartFile
	 * @return
	 * @throws IOException
	 */
	public UserImage saveFileToS3(MultipartFile multipartFile) throws FileArchiveServiceException {

		try {
			File fileToUpload = convertFromMultiPart(multipartFile);
			String key = Instant.now().getEpochSecond() + "_" + fileToUpload.getName();

			/* save file */
			springCloudS3.uploadS3Object(fileToUpload, key, S3_BUCKET_NAME);
			logger.info("{} file uploaded to S3", key);

			/* get signed URL (valid for 7 days) */
			GeneratePresignedUrlRequest generatePresignedUrlRequest = new GeneratePresignedUrlRequest(S3_BUCKET_NAME,
					key);
			generatePresignedUrlRequest.setMethod(HttpMethod.GET);
			generatePresignedUrlRequest.setExpiration(DateTime.now().plusDays(7).toDate());

			URL signedUrl = amazonS3.generatePresignedUrl(generatePresignedUrlRequest);

			return new UserImage(key, signedUrl.toString());
		} catch (Exception ex) {
			throw new FileArchiveServiceException("An error occurred saving file to S3", ex);
		}
	}

	/**
	 * Delete image from S3 using specified key
	 *
	 * @param customerImage
	 */
	public void deleteImageFromS3(UserImage customerImage) {
		logger.info("Deleting S3 object: {}", customerImage.getKey());
		String resolvedBucketName = springCloudS3.resolveBucketName(S3_BUCKET_NAME);
		amazonS3.deleteObject(new DeleteObjectRequest(resolvedBucketName, customerImage.getKey()));
	}

	/**
	 * Convert MultiPartFile to ordinary File
	 *
	 * @param multipartFile
	 * @return
	 * @throws IOException
	 */
	private File convertFromMultiPart(MultipartFile multipartFile) throws IOException {

		File file = new File(multipartFile.getOriginalFilename());
		file.createNewFile();
		FileOutputStream fos = new FileOutputStream(file);
		fos.write(multipartFile.getBytes());
		fos.close();

		return file;
	}

}
convertFromMultiPart() - The MultiPartFile uploaded from the client is converted to a regular File.
saveFileToS3() - Does the following operations:
- A key is generated using the file name and time stamp. The combination of file name and time stamp is important so that multiple files can be uploaded with the same name.
- The S3 client (springCloudS3) saves the file to the specified bucket using the generated key.
- Using the bucket name and key to uniquely identify this resource, a pre signed public facing URL is generated that can be later used to retrieve the image. The expiration is set to 7 days from today to tell S3 to make the resource available using this public URL for no more than 7 days.
- The generated key and public facing URL are wrapped in a UserImage and returned to the controller. UserImage is saved to the database as part of the User persist and is the link between the User stored in the database and the user’s image file on S3. When a client issues a GET request for a specific user the public facing URL to the user image is returned. This allows the client application to reference the image directly from S3.
deleteImageFromS3() - Delete image from S3 using specified key. Spring’s Resource API does not support the full life cycle of operations. The two main interfaces are
ResourceandWritableResource. There is no API for deletion. So we explicitly inject AmazonS3Client and calldeleteObject().
SpringCloudS3.java
@Component
public class SpringCloudS3 {

    ResourceLoader resourceLoader;
	ResourceIdResolver idResolver;

	@Autowired
	public SpringCloudS3(ResourceLoader loader, ResourceIdResolver idResolver) {
		this.resourceLoader = loader;
		this.idResolver = idResolver;
	}

	public Resource resolveAndLoad(String bucketName, String resourceName) {
		String resolvedBucketName = this.idResolver.
			resolveToPhysicalResourceId(bucketName);
		return this.resourceLoader.
				getResource("s3://" + resolvedBucketName + "/" + resourceName);
	}

	public String resolveBucketName(String bucketName) {
		String resolvedBucketName = this.idResolver.
			resolveToPhysicalResourceId(bucketName);
		return resolvedBucketName;
	}

    public void downloadS3Object(String bucketName, String resourceName) throws IOException {
        Resource resource = resolveAndLoad(bucketName, resourceName);
        File downloadedS3Object = new File(resource.getFilename());
        try (InputStream inputStream = resource.getInputStream()) {
            Files.copy(inputStream, downloadedS3Object.toPath(), StandardCopyOption.REPLACE_EXISTING);
        }
    }

    public void uploadS3Object(File file, String resourceName, String bucketName) throws IOException {
        WritableResource resource = (WritableResource) resolveAndLoad(bucketName, resourceName);
        try (OutputStream outputStream = resource.getOutputStream()) {
            Files.copy(file.toPath(), outputStream);
        }
    }
}
The Spring Framework provides a org.springframework.core.io.ResourceLoader abstraction to load files from the filesystem, servlet context and the classpath. Spring Cloud AWS adds support for the Amazon S3 service to load and write resources with the resource loader and the S3 protocol.
Also we would be using AWS CloudFormation service eventually to spin up this infrastructure. The buckets created via CloudFormation will typically have a generated name that must be used as the bucket name. In order to allow application developers to define static names inside their configuration, Spring Cloud AWS provides support to resolve the generated bucket names. Application developers can use the org.springframework.cloud.aws.core.env.ResourceIdResolver interface to resolve the physical names that are generated based on the logical names.
Java Resource Configuration for AWS
The AwsResourceConfig class handles configuration required for integration with S3 storage and the MySQL instance running on RDS. The contents of this class are explained in detail below.
- @Configuration indicates that this class contains configuration and should be processed as part of component scanning.
- @ImportResources tells Spring to load the XML configuration defined in aws-config.xml. We’ll cover the contents of this file later.
- @EnableRdsInstance is provided by Spring Cloud AWS as a convenient way of configuring an RDS instance. The databaseName, dbInstanceIdentifier and password are defined when setting up the RDS instance in the AWS console. We’ll look at RDS set up later.
- Spring Cloud AWS provides a
org.springframework.cloud.aws.jdbc.config.annotation.RdsInstanceConfigurerthat creates aorg.springframework.cloud.aws.jdbc.datasource.DataSourceFactorywhich might contain custom pool attributes
AwsResourceConfig.java
@Configuration
@ImportResource("classpath:/aws-config.xml")
@EnableRdsInstance(databaseName = "${database-name:}", dbInstanceIdentifier =
  "${db-instance-identifier:}", username = "${rdsUser:}", password = "${rdsPassword:}")
public class AwsResourceConfig {

	@Bean
    public RdsInstanceConfigurer instanceConfigurer() {
        return new RdsInstanceConfigurer() {
            @Override
        	public DataSourceFactory getDataSourceFactory() {
        		TomcatJdbcDataSourceFactory dataSourceFactory = new TomcatJdbcDataSourceFactory();
                dataSourceFactory.setInitialSize(10);
                dataSourceFactory.setValidationQuery("SELECT 1 FROM DUAL");
                dataSourceFactory.setValidationInterval(10000);
                dataSourceFactory.setTimeBetweenEvictionRunsMillis(20000);
                dataSourceFactory.setTestOnBorrow(true);
                dataSourceFactory.setTestWhileIdle(true);
                return dataSourceFactory;
        	}
        };
    }

}
XML Resource Configuration for AWS
In order to access protected resources using Amazons SDK an access key and a secret key must be supplied. Spring Cloud for AWS provides an XML namespace for configuring both values so that they are available to the SDK at runtime.
- It’s important to note that these values should not be set directly in your configuration or properties files and should be passed to the application on start up (via environment or system variables). The secret key as the name suggests is very sensitive and if compromised will provide a user with access to all AWS services on your account. Make sure this value is not checked into source control, especially if your code is in a public repository. It’s common for applications to trawl public repositories looking for keys that are subsequently used to compromise AWS accounts.
- An instance profile configuration allows to assign a profile that is authorized by a role while starting an EC2 instance. An instance profile is a container for an IAM role that you can use to pass role information to an EC2 instance when the instance starts.
- All calls made from the EC2 instance are then authenticated with the instance profile specific user role. Therefore there is no dedicated access-key and secret-key needed in the configuration. In our case it is useful to combine both authentication strategies to allow the application to use the instance profile with a fallback for an explicit access-key and secret-key configuration. This is useful if the application is tested inside EC2 (e.g. on a test server) and locally for testing. The next snippet shows a combination of both security configurations.
- The context-resource-loader is required to access S3 storage. You’ll remember that we injected an instance of AmazonS3Client into the SpringCloudS3Service earlier. The context-resource-loader ensures that an instance of AmazonS3Client is available with the credentials supplied in context-credentials.
aws-config.xml
<beans xmlns="http://www.springframework.org/schema/beans"
	xmlns:xsi="http://www.w3.org/2001/XMLSchema-instance"
	xmlns:aws-context="http://www.springframework.org/schema/cloud/aws/context"
	xmlns:jdbc="http://www.springframework.org/schema/cloud/aws/jdbc"
	xsi:schemaLocation="http://www.springframework.org/schema/beans
						   http://www.springframework.org/schema/beans/spring-beans-4.1.xsd
						   http://www.springframework.org/schema/cloud/aws/context
						   http://www.springframework.org/schema/cloud/aws/context/spring-cloud-aws-context-1.0.xsd
	   					   http://www.springframework.org/schema/cloud/aws/jdbc
						   http://www.springframework.org/schema/cloud/aws/jdbc/spring-cloud-aws-jdbc-1.0.xsd">

	<aws-context:context-credentials>
		<aws-context:instance-profile-credentials />
		<aws-context:simple-credentials
			access-key="${accessKey:}" secret-key="${secretKey:}" />
	</aws-context:context-credentials>
	<aws-context:context-resource-loader/>
</beans>
Spring Configuration
We are using 2 profiles for our application.
While running locally we would need to supply the accessKeyID and secretAccessKey. That’s when we use the default profile. Following are some of the important configuration elements for default profile:
- cloud.aws.credentials.instanceprofile = false
- Spring Cloud AWS provides support to configure the credential information with the Spring Boot application configuration files. To configures an instance profile credentials provider with no further configuration use this property.
- cloud.aws.region.auto = false
- Enables automatic region detection based on the EC2 meta data service
- cloud.aws.region.static = “us-west-1”
- Configures a static region for the application. Possible regions are (currently) us-east-1, us-west-1, us-west-2, eu-west-1, eu-central-1, ap-southeast-1, ap-southeast-1, ap-northeast-1, sa-east-1, cn-north-1 and any custom region configured with own region meta data
- cloud.aws.stack.auto = false
- Spring Cloud AWS supports the configuration of the CloudFormation support within the Spring Boot configuration. The automatic stack configuration can be defined with this property.
While running the app in EC2 instances we would make use of the aws profile.
- cloud.aws.credentials.instanceprofile = true
- cloud.aws.region.auto = true
- cloud.aws.stack.auto = false
- cloud.aws.credentials.useDefaultAwsCredentialsChain = true
Use the DefaultAWSCredentials Chain instead of configuring a custom credentials chain. This means the
com.amazonaws.auth.DefaultAWSCredentialsProviderChainis used by all the clients if there is no dedicated credentials provider defined. This will essentially use the following authentication information- use the environment variables
AWS_ACCESS_KEY_IDandAWS_SECRET_ACCESS_KEY - use the system properties
aws.accessKeyIdandaws.secretKey - use the user specific profile credentials file
- use ECS credentials if the
AWS_CONTAINER_CREDENTIALS_RELATIVE_URIenvironment variable is set - use the instance profile credentials (see below)
- use the environment variables
application.yml
spring:
  profiles: default
  application:
    name: springboot-aws-starter
  datasource:
    initialization-mode: always
    schema: classpath:/scripts/schema.sql
  jpa:
    show-sql: true
    database-platform: org.hibernate.dialect.MySQLDialect
    hibernate:
      ddl-auto: none
  thymeleaf:
    cache: false
  servlet:
    multipart:
      max-file-size: 128KB
      max-request-size: 128KB

cloud:
  aws:
    credentials:
      instanceProfile: false
    region:
      auto: false
      static: 'us-west-1'
    stack:
      auto: false

# Make the application available at http://localhost:8080
# These are default settings, but we add them for clarity.
server:
  port: 8080
  servlet:
    context-path: /springboot-aws-starter

logging:
  level:
    org.springframework: INFO
    com.example.aws: ERROR
  pattern:
    console: "%d{HH:mm:ss.SSS} [%t] %-5level %logger{36} - %msg%n"
    file: "%d %p %c{1.} [%t] %m%n"
  file: logs/springboot-aws-starter.log

---

spring:
  profiles: aws
  application:
    name: springboot-aws-starter
  datasource:
    initialization-mode: always
    schema: classpath:/scripts/schema.sql
  jpa:
    show-sql: false
    database-platform: org.hibernate.dialect.MySQLDialect
  thymeleaf:
    cache: false
  servlet:
    multipart:
      max-file-size: 128KB
      max-request-size: 128KB

cloud:
  aws:
    credentials:
      instanceProfile: true
      useDefaultAwsCredentialsChain: true
    region:
      auto: true
    stack:
      auto: false

server:
  port: 8080
  servlet:
    context-path: /springboot-aws-starter

logging:
  level:
    org.springframework: INFO
    com.example.aws: ERROR
  pattern:
    console: "%d{HH:mm:ss.SSS} [%t] %-5level %logger{36} - %msg%n"
    file: "%d %p %c{1.} [%t] %m%n"
  file: logs/springboot-aws-starter.log
Now that the core server side components are in place it’s time to look at some of the client side code. I’m not going to cover it in great detail as the focus of this post is integrating with AWS.
Thymeleaf UI
We make use of Thymeleaf Fragments to reuse some common parts of a site. We make use of the following frontend libraries for rendering the UI and include them in the layout section:
- bootstrap: 3.3.7
- font-awesome : v5.4.1
- bootstrap-datepicker : 1.9.0
- jquery : 3.4.1
Running the application locally
Its preferable to run the application locally before attempting to deploy it to EC2 as it helps iron out any issues with RDS or S3 connectivity.
In order to run the application we need to supply application properties on start-up. The properties are defined below and are set based on the values used to create the database instance and the access keys associated with your account.
{
 "database-name": "starter_db",
 "db-instance-identifier": "starter-db",
 "rdsUser": "root",
 "rdsPassword": "starter-password",
 "accessKey": "XXXXXXXXXXXXXXXXXXXX",
 "secretKey": "XXXXXXXXXXXXXXXXXXXXXXXXXXXXXX"
}
SpringBoot allows you to supply configuration on the command line via a the -Dspring.application.json system variable.
java -Dspring.profiles.active=default -Dspring.application.json='{"database-name": "starter_db","db-instance-identifier": "starter-db","rdsUser": "root","rdsPassword": "starter-password","accessKey": "XXXXXXXXXXXXXXXX","secretKey": "XXXXXXXXXXXXXXXXXXXXXXXXXXXXXXXX"}' -jar target/springboot-aws-starter.jar
You can also supply configuration via the SPRING_APPLICATION_JSON environment variable. An example of supplying the environment variable and running the application in STS is shown below.
At this point you should have the application up and running. When the application starts it will establish a connection with the database instance on RDS. Navigate to http://localhost:8080/springboot-aws-starter/ and you should see the home screen.
The demo app is now complete so its time to turn our attention to AWS so that we can configure the resources needed. Please refer to this article for Step-By-Step guide to the next steps: EC2-S3-RDS
Avijit Chatterjee
Reactive programming enthusiast keen on learning new technologies