Passive Service Discovery
Overview
In order for the Configuration management in the Cloud be Passive we need to have a mechanism for applications in a microservices pattern to register themselves when they are UP. That way other dependent services could lookup and make service calls.
In Spring Cloud this boils down to 3 components:
- Discovery server
- Eureka Service
- Eureka Client

Eureka Server
Source code for a sample Eureka-Server can be found here
But it’s relatively straight forward to look under the hood and create one ourselves. That way we may be able to learn a few important concepts related to “Spring” discovery in the cloud.
Here’s the steps I followed:
Create a new Spring Boot application. Name the project “eureka-server”, and use this value for the Artifact. Use JAR packaging and the latest versions of Java, Boot version 2.5.7 is the most recent at the time of this writing, but you can generally use the latest stable version available.
Edit the POM (or Gradle) file. Add a “Dependency Management” section (after
, before ) to identify the spring cloud parent POM. “2020.0.4” is the most recent stable version at the time of this writing, but you can use the latest stable version available. Add a dependency for group “org.springframework.cloud” and artifact “spring-cloud-starter-netflix-eureka-server”. You do not need to specify a version – this is already defined in the parent project.
Eureka-Server would be loading it’s configuration from the Config Server i.e. it’s a Config Client.
For the Config Client, it could be a Config First Bootstrap or a Discovery First Lookup. With Spring Cloud Vault 3.0 and Spring Boot 2.4, the default bootstrap context initialization (bootstrap.yml, bootstrap.properties) of property sources was deprecated. Hence there are two choices for the Config Client:
Use Spring Boot 2.4.0 Config Data API to import configuration from Vault (Preferred)
Legacy Processing: Enable the bootstrap context either by setting the configuration property spring.cloud.bootstrap.enabled=true or by including the dependency spring-cloud-starter-bootstrap.
In order to focus the conversation around Spring Cloud Config we use the second option.
<dependencyManagement>
  <dependencies>
    <dependency>
      <groupId>org.springframework.cloud</groupId>
      <artifactId>spring-cloud-dependencies</artifactId>
      <version>2020.0.4</version>
      <type>pom</type>
      <scope>import</scope>
    </dependency>
  </dependencies>
</dependencyManagement>
...
...
<dependency>
	<groupId>org.springframework.cloud</groupId>
	<artifactId>spring-cloud-starter-netflix-eureka-server</artifactId>
</dependency>
<dependency>
  <groupId>org.springframework.cloud</groupId>
  <artifactId>spring-cloud-starter-bootstrap</artifactId>
</dependency>
Next we need to add/edit the “Spring” configuration. We need to tell eureka-server where to look further for it’s configuration. That’s all. We do so with a bootstrap.yml/bootstrap.properties file with the following properties:
spring:
  config:
    activate:
      on-profile:
       - default
  application:
    name: eureka-server
  cloud:
    config:
      uri: http://localhost:8888
      fail-fast: true
      password: ${CONFIG_SERVICE_PASSWORD}
      username: user
Add a eureka-server.yml file on the config-server project under src/main/resources/shared folder. Add the following content there:
spring:
  config:
    activate:
      on-profile:
       - default

server:
  port: 8761

eureka:
  instance:
    hostname: localhost
    prefer-ip-address: true
  client:
    registerWithEureka: false
    fetchRegistry: false
    server:
      waitTimeInMsWhenSyncEmpty: 0
    serviceUrl:
      defaultZone: http://${eureka.instance.hostname}:${server.port}/eureka/
As you can imagine there can be different deployment configurations possible with eureka-server in the cloud.
Here we are sticking with Standalone Mode by switching off the client side behavior with registerWithEureka=false and fetchRegistry=false
Add @EnableEurekaServer to the Application class.
@SpringBootApplication
@EnableEurekaServer
public class EurekaServerApplication {

	public static void main(String[] args) {
		SpringApplication.run(EurekaServerApplication.class, args);
	}

}
Save. Start the server. If you use Maven, run the following command in a terminal window (in the complete) directory:
./mvnw spring-boot:run -Dspring-boot.run.profiles=default \
                       -Dspring-boot.run.jvmArguments="-DCONFIG_SERVICE_PASSWORD=********"
Temporarily ignore the warnings about running a single instance (i.e. connection refused, unable to refresh cache, backup registry not implemented, etc.). Open a browser to http://localhost:8761 to see the server running.
Eureka Service
Next we would create an Eureka aware Service. Meaning this service will register with eureka-server on startup.
Create a new, separate Spring Boot application. Use a latest version of Spring Boot(2.5.7). Name the project “todo-server”, and use this value for the Artifact. Add the web and actuator dependencies. You can make this a JAR project.
Open the POM (or Gradle) file and add a “Dependency Management” section (after , before ) to identify the spring cloud parent pom. (You could simply change the parent entries, but most clients will probably be ordinary applications with their own parents)
Add a dependency for group “org.springframework.cloud” and artifact “spring-cloud-starter-netflix-eureka-client”. You do not need to specify a version – this is already defined in the parent pom in the dependency management section.
Because the todo-server would be a Config Client too, it could be configured as a Config First Bootstrap or a Discovery First Lookup. With Spring Cloud Vault 3.0 and Spring Boot 2.4, the default bootstrap context initialization (bootstrap.yml, bootstrap.properties) of property sources was deprecated. Hence there are two choices for the Config Client:
Use Spring Boot 2.4.0 Config Data API to import configuration from Vault (Preferred)
Legacy Processing: Enable the bootstrap context either by setting the configuration property spring.cloud.bootstrap.enabled=true or by including the dependency spring-cloud-starter-bootstrap. In order to focus the conversation around Spring Cloud Config we use the second option.
<dependencyManagement>
		<dependencies>
			<dependency>
				<groupId>org.springframework.cloud</groupId>
				<artifactId>spring-cloud-dependencies</artifactId>
				<version>${spring-cloud.version}</version>
				<type>pom</type>
				<scope>import</scope>
			</dependency>
		</dependencies>
</dependencyManagement>
...
...
<dependency>
    <groupId>org.springframework.cloud</groupId>
    <artifactId>spring-cloud-starter-netflix-eureka-client</artifactId>
</dependency>
<dependency>
			<groupId>org.springframework.cloud</groupId>
			<artifactId>spring-cloud-starter-bootstrap</artifactId>
</dependency>
Add a bootstrap.yml (or bootstrap.properties) file in the root of your classpath (src/main/resources recommended). We need to tell todo-server where to look further for it’s configuration. That’s all. Add the following key/values using the appropriate format:
spring:
  config:
    activate:
      on-profile:
       - default
  application:
    name: todo-server
  cloud:
    config:
      uri: http://localhost:8888
      fail-fast: true
      password: ${CONFIG_SERVICE_PASSWORD}
      username: user
Add a todo-server.yml file on the config-server project under src/main/resources/shared folder. Add the following content there:
spring:
  config:
    activate:
      on-profile:
       - default

todo-config: TBD

server:
  address: localhost
  servlet:
    context-path: /todo-server

eureka:
  instance:
    prefer-ip-address: true
    ip-address: ${server.address}
    instance-id : ${server.address}:${server.port}
    metadataMap:
      configPath: /todo-server
  client:
    serviceUrl:
      defaultZone: http://localhost:8761/eureka/
Edit the application to read the todo-config. For simplicity’s sake we add a
@RestControllerannotation to the SpringBoot class and just returned to the browser. Also we would start up 2 instances of the todo-server and make them discoverable via the eureka-server to the client application. So we have added a service.instance.name property whose value we would set at startup, along with the server.port@SpringBootApplication @EnableDiscoveryClient @RestController public class TodoServerApplication { @Value("${todo-config}") String todoConfig; @Value("${service.instance.name}") private String instance; public static void main(String[] args) { SpringApplication.run(TodoServerApplication.class, args); } @GetMapping("/todo-config") public String showTodoConfig() { return "The todoConfig is: " + todoConfig; } @RequestMapping("/") public String message() { return "Hello from " + instance; } }Start the todo-server next. We need to modify the Run Configurations via IDE or commandline like so. Also remember to set the CONFIG_SERVICE_PASSWORD to it’s correct value on the Environment tab. Here’s how I did it via STS.


Once both instances are up and running go to the Eureka dashboard to find the registered instances.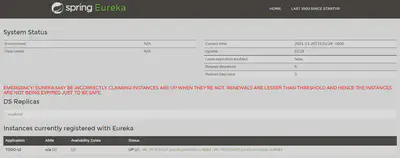
Eureka Client
Next we would add the Eureka aware Client meaning it does not register itself with eureka-server, but only uses it to lookup others. Assuming no one else needs to discover the client.
The steps are inline with the Eureka Service. Just a few tweaks.
Create a new, separate Spring Boot application. Use a latest version of Spring Boot(2.5.7). Name the project “todo-ui”, and use this value for the Artifact. Add the web and actuator dependencies. You can make this a JAR project.
Open the POM (or Gradle) file and add a “Dependency Management” section (after , before ) to identify the spring cloud parent pom. (You could simply change the parent entries, but most clients will probably be ordinary applications with their own parents)
Add a dependency for group “org.springframework.cloud” and artifact “spring-cloud-starter-netflix-eureka-client”. You do not need to specify a version – this is already defined in the parent pom in the dependency management section.
Because the todo-ui would be a Config Client too, it could be configured as a Config First Bootstrap or a Discovery First Lookup. With Spring Cloud Vault 3.0 and Spring Boot 2.4, the default bootstrap context initialization (bootstrap.yml, bootstrap.properties) of property sources was deprecated. Hence there are two choices for the Config Client:
Use Spring Boot 2.4.0 Config Data API to import configuration from Vault (Preferred)
Legacy Processing: Enable the bootstrap context either by setting the configuration property spring.cloud.bootstrap.enabled=true or by including the dependency spring-cloud-starter-bootstrap. In order to focus the conversation around Spring Cloud Config we use the second option.
<dependencyManagement>
		<dependencies>
			<dependency>
				<groupId>org.springframework.cloud</groupId>
				<artifactId>spring-cloud-dependencies</artifactId>
				<version>2020.0.4</version>
				<type>pom</type>
				<scope>import</scope>
			</dependency>
		</dependencies>
</dependencyManagement>
...
...
<dependency>
			<groupId>org.springframework.cloud</groupId>
			<artifactId>spring-cloud-starter-netflix-eureka-client</artifactId>
</dependency>
<dependency>
      <groupId>org.springframework.cloud</groupId>
      <artifactId>spring-cloud-starter-bootstrap</artifactId>
</dependency>
Add a bootstrap.yml (or bootstrap.properties) file in the root of your classpath (src/main/resources recommended). We need to tell todo-ui where to look further for it’s configuration. That’s all. Add the following key/values using the appropriate format:
spring:
  config:
    activate:
      on-profile:
       - default
  application:
    name: todo-ui
  cloud:
    config:
      uri: http://localhost:8888
      fail-fast: true
      password: ${CONFIG_SERVICE_PASSWORD}
      username: user
Add a todo-ui.yml file on the config-server project under src/main/resources/shared folder. Add the following content there:
spring:
  config:
    activate:
      on-profile:
       - default
  application:
    name: todo-ui

# Make the application available at http://localhost:8080
# These are default settings, but we add them for clarity.
server:
  port: 8080
  servlet:
    context-path: /todo-ui

eureka:
  client:
    registerWithEureka: false
    serviceUrl:
      defaultZone: http://localhost:8761/eureka/
Edit the application to search and find the todo-server endpoint from the Eureka Server and invoke the root endpoint. We started 2 instances of the todo-server and both of them registered with eureka-server. Hence when we retrieve the discovered endpoint, it could be either one.
@SpringBootApplication
@EnableDiscoveryClient
@RestController
public class TodoUiApplication {

	@Autowired
	private EurekaClient client;

	@Autowired
	private RestTemplateBuilder restTemplateBuilder;

	public static void main(String[] args) {
		SpringApplication.run(TodoUiApplication.class, args);
	}

	@RequestMapping("/")
	public String callService() {
		RestTemplate restTemplate = restTemplateBuilder.build();
		InstanceInfo instanceInfo = client.getNextServerFromEureka("todo-server", false);
		String baseUrl = instanceInfo.getHomePageUrl();
		String contextPath = instanceInfo.getMetadata().get("configPath");

		ResponseEntity<String> response =
				restTemplate.exchange(baseUrl+contextPath, HttpMethod.GET, null, String.class);
		return response.getBody();
	}

}
Note: We have the todo-server exposed at a contextPath: /todo-server, meaning when the client needs to call the todo-server endpoint the server expects the requests to come to:
- http://localhost:8081/todo-server or
- http://localhost:8081/todo-server.
This is handled via the metadata provided to Eureka via the config server. See the documentation here.
- If you use Maven, run the following command in a terminal window (in the complete) directory:
./mvnw spring-boot:run -Dspring-boot.run.profiles=default \
                       -Dspring-boot.run.jvmArguments="-DCONFIG_SERVICE_PASSWORD=********"