Working with Pods
Overview
In the VMware world, the atomic unit of deploying is the virtual machine; in the Docker world, it’s the container. Well, in the Kubernetes world, it’s the Pod.
You start out with app code, build it into a container image, store that in a repo, define it in a Kubernetes manifest, and then post that to the API server. Kubernetes, then does the rest.
Versioning
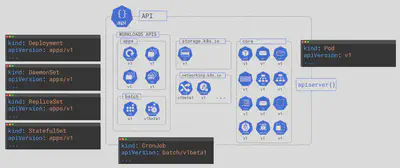
As we discussed in the Big Picture the K8s API is versioned and split into multiple subgroups. That also plays a huge role in their versioning in the pod manifest:
Pod Manifest
As you see Pods are part of the core API group. So we start with version V1.
On the left here, we’re looking at the object definition in the API. And then on the right is how we define it in a YAML file. So anything we define in the YAML on the right has to be there in the v1 pod object in the API on the left.
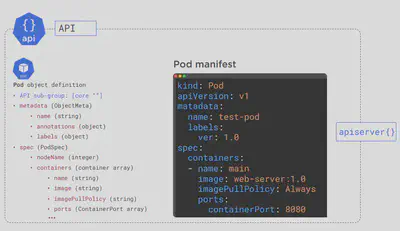
We’re giving it a name and label (key value pair), and a containers spec. As we have discussed before in the Big Picture we are wrapping the container within few lines of pod code. So that’s our nesting, the container inside the pod.

Here’s the full manifest:
# Simple Kubernetes Pod to deploy the app contained in avijitchatterjee/getting-started-k8s:1.0
apiVersion: v1
kind: Pod
metadata:
  name: hello-pod
  labels:
    app: web
spec:
  containers:
    - name: web-ctr
      image: avijitchatterjee/getting-started-k8s:1.0
      ports:
        - containerPort: 8080
Pod Deployment
Once we have the Pod manifest ready we are ready to create a Pod. As discussed in the Big Picture it could be either Imperative way or Declarative way.
Declarative: The command set
kubectl applyis used at a terminal’s command-line window to create or modify Kubernetes resources defined in a manifest file. This is called a declarative usage. The state of the resource is declared in the manifest file, thenkubectl applyis used to implement that state. kubectl is going to post that file to the API server. The request will be authenticated and authorized. The config will get persisted to the cluster store, and the scheduler will assign the Pod to a node.$ kubectl apply -f pod.yml pod/hello-pod createdImperative:
kubectl createorrunis the command you use to create a Kubernetes resource directly at the command line. This is an imperative usage. You can also use kubectlcreateagainst a manifest file to create a new instance of the resource. However, if the resource already exists, you will get an error.$ kubectl create -f pod.ymlor
$ kubectl run hello-pod --image=avijitchatterjee/getting-started-k8s:1.0

# Run pod nginx and write its spec into a file called pod.yaml
$ kubectl run hello-pod --image=avijitchatterjee/getting-started-k8s:1.0 --dry-run=client -o yaml > pod.yaml
The important thing to understand about kubectl
createvs. kubectlapplyis that you use kubectlcreateto create Kubernetes resources imperatively at the command-line or declaratively against a manifest file. However, you can use kubectlcreatedeclaratively only to create a new resource only. If the resource already exists when you execute the imperativecreate, you’ll get the following error:Error from server (AlreadyExists): deployments.apps "mydeployment" already existsOn the other hand, you use kubectl
applyto create a new Kubernetes resource declaratively using a manifest file. You can also use kubectlapplyto update an existing resource by changing the configuration settings in the given manifest file (change the label maybe) and apply those changes to an existing Pod.
Inspecting Pod
There are several commands for printing information about an object:
get: Prints basic information about matching objects. Use get -h to see a list of options.describe: Prints aggregated detailed information about matching objects.logs: Prints the stdout and stderr for a container running in a Pod.
# -w or --watch flag to start watching updates to a particular object.
$ kubectl get pods --watch
NAME        READY   STATUS              RESTARTS   AGE
hello-pod   0/1     ContainerCreating   0          6s
hello-pod   1/1     Running   0          2m58s

# List all pods in the namespace, with more details
$ kubectl get pods -o wide
NAME        READY   STATUS    RESTARTS   AGE     IP              NODE          NOMINATED NODE   READINESS GATES
hello-pod   1/1     Running   0          4m52s   192.168.126.1   k8s-worker2   <none>           <none>

# Describe commands with verbose output
$ kubectl describe pods hello-pod

# dump pod logs (stdout)
$ kubectl logs hello-pod
# dump pod logs, with label name=myLabel (stdout)
$ kubectl logs -l name=web -c web-ctr
Multi-container Pods
- SideCar : The sidecar pattern is a design pattern that runs supporting services isolated from the main application. The isolation is best achieved as a separate container from the main application. Besides that, these supporting services are usually handling cross-cutting concerns, such as log shipping and network-level fault tolerance mechanisms.
Below is an example of a SideCar-Container Pod. We can see we’ve got two containers specs. Also we can see the main container is wrting logs and the sidecar is reading them out (in real world could be Splunk forwarder or something like that…)

apiVersion: v1
kind: Pod
metadata:
  name: sidecar-test
spec:
  containers:
  - name: writer
    image: busybox:stable
    command: ['sh', '-c', 'echo "The writer wrote this!"
    > /opt/logs.txt; while true; do sleep 5; done']
    volumeMounts:
    - name: logs
      mountPath: /opt
  - name: sidecar
    image: busybox:stable
    command: ['sh', '-c', 'while true;
    do cat /opt/logs.txt; sleep 5; done']
    volumeMounts:
    - name: logs
      mountPath: /opt
  volumes:
    - name: logs
      emptyDir: {}
- Ambassador: An ambassador container proxies network traffic to and/or from the main container.
- Adapter : An adapter container transforms the main container’s output.
You would run it the same way:
$ kubectl apply -f multi-pod.yml
pod/nginx created

# Watch Pods
$ kubectl get pods --watch
NAME        READY   STATUS              RESTARTS        AGE
nginx       0/2     ContainerCreating   0               8s
nginx       2/2     Running             0               9s

# Delete pods
$ kubectl delete -f multi-pod.yml