Build, Deploy and Manage APIs
Overview
Amazon API Gateway is a fully managed service that makes it easy for developers to publish, maintain, monitor and secure APIs at any scale. You can create an API that acts as a front door for applications to access data, business logic or functionality from your backend services such as applications running on EC2, code running on Lambda or any web application.
Features
Developer Features in Amazon API Gateway:
- Exposes HTTPS endpoints to define a RESTful API.
Serverless-lyconnect to other AWS services likeLambda,DynamoDB,SQSand so on.- Maintain multiple versions of your API.
- Transform or validate request/response data
- Generate and export a fully working SDK of your API, which you can use in your own application code. This SDK feature supports several languages such as Java, Javascript, iOS, Ruby SDKs, and several other programming languages.
- Import/Export to Swagger
Features for Managing API Access:
- Built-in, flexible authorization options using IAM roles, AWS Lambda authorizers, or Amazon Cognito.
- Track and control usage by API key
- Throttle requests to prevent attacks.
- Connect to Cloudwatch to log all requests for monitoring
- You can enable API caching in API Gateway. It allows you to cache your endpoints response. With caching enabled you can reduce the number of calls made to your end point and also improve the latency of requests to your API. So when you enable API caching for a
stageAPI gateway caches a response from your end point for specified TTL time in seconds.
Design Considerations
Before you start writing your APIs, you’ll need to decide the type of endpoint that makes sense for the traffic and usage patterns you anticipate.
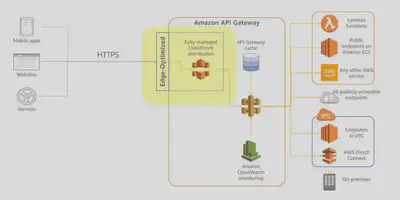
Edge-optimized Endpoint
Designed to help you reduce client latency from anywhere🌎 on the internet:
- If you choose an edge-optimized endpoint, API Gateway will automatically configure a
CloudFrontdistribution that’s fully managed to provide lower latency access to your API. - This setup reduces your first hit latency.
- The other benefit of using a managed CloudFront distribution is that you don’t have to pay for or manage it separately from API Gateway.
Regional Endoint

region as the API:
- In this model, API Gateway does not deploy its own CloudFront distribution in front of your API. Instead, traffic destined for your API will be directed straight at the API endpoint in the
regionwhere you’ve deployed it. - This gives you lower latency for applications that are invoking your API from within the same AWS Region. For example, an API that is going to be accessed from EC2 instances within the same region.
- This API endpoint also allows you the flexibility to deploy your own CloudFront distribution in front of API Gateway and control that distribution using your own settings for customized scenarios. An example of that might be to design for disaster recovery scenarios or implement load balancing in a very customized way.
Private Endpoint
Designed to expose APIs only inside your VPC:
- This endpoint type is still managed by API Gateway, but requests are only routable, and can only originate, from within a single
VPCthat you control. - This is designed for applications that have very secure workloads, like healthcare or financial data that cannot be exposed publicly on the internet.
- There are no data transfer-out charges for private APIs. However, AWS
PrivateLinkcharges apply when using private APIs in API Gateway.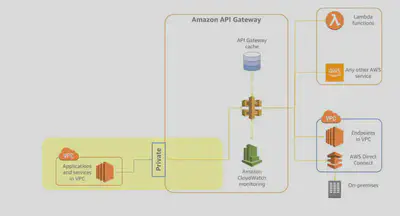
Authorizers
There are three main ways to authorize API calls to your API Gateway endpoints:
IAMand Signature version 4 (also known as Sig v4),- AWS
Lambda Authorizers, - Amazon
Cognitowith Cognito user pools.
Authorization Option Comparison:
Each of these have advantages that should be matched to both your application needs and your organizational standards.
| Authentication | Authorization | Signature V4 | Cognito User Pools | Third-Party Auth | Multiple Header support | Additional Costs | |
|---|---|---|---|---|---|---|---|
| AWS IAM | ✔️ | ✔️ | ✔️ | None | |||
| Lambda Authorizer Token | ✔️ | ✔️ | ✔️ | ✔️ | Pay per authorizer invoke | ||
| Lambda Authorizer Request | ✔️ | ✔️ | ✔️ | ✔️ | ✔️ | Pay per authorizer invoke | |
| Amazon Cognito | ✔️ | ✔️ | None |
IAM Authorizers
- If you have an internal service or a restricted number of customers,
IAMis a great choice - especially for applications that use IAM to interact with other AWS services using IAM roles. - When you enable IAM authorization, all requests are required to be signed using the AWS Version 4 signing process (also known as Sig v4).
- The process uses your AWS access key and secret key to compute an HMAC signature using SHA 256.
- You can obtain these keys as an IAM user or by assuming an IAM
role. - The key information is added to the Authorization header, and behind the scenes, API Gateway will take that signed request, parse it, and determine whether or not the user who signed the request has the IAM permissions to invoke your API. If not, API Gateway will simply deny and reject that request.
- So for this type of authentication, your requestor must have AWS credentials.

Lambda Authorizers
- If you are using an OATH strategy as an organization, you may want to look👀 at Token authorization with a Lambda Authorizer.
- A Lambda authorizer is simply a Lambda function that you can write to perform any custom authorization that you need.
- There are two types of Lambda Authorizers:
TokenandRequest. - When a client calls your API, API Gateway verifies whether a Lambda authorizer is configured for the API method. If so, API Gateway calls the Lambda function. In this call, API Gateway supplies the authorization token (or the request parameters based on the type of authorizer), and the Lambda function returns a policy that allows or denies the caller’s request.
- API Gateway also supports an optional policy cache that you can configure for your Lambda Authorizer. This feature increases performance by reducing the number of invocations of your Lambda authorizer for previously authorized tokens. And with this cache, you can configure a custom TTL.
- To make it easy to get started with this method, you can choose the API Gateway Lambda Authorizer blueprint when creating your authorizer function from the Lambda console.

- For Lambda authorizers of the
TOKENtype, API Gateway passes the source token to the Lambda function as a JSON input. Based on the value of this token, your Lambda function will determine whether to allow the request. - If it does allow the request, then your Lambda function will return an IAM policy that Allows execute-API: Invoke on the particular API resources that you specified. This lets a caller invoke the specified methods that are defined in the API in the JSON output.
- If your Lambda function denies the request, you’ll need to return a JSON policy document that Denies access to the API methods and resources specified. In this case, the client receives a 403 error.

- Lambda authorizers of
REQUESTtype are useful if you need more information about the request itself before authorizing it. - Request type authorizers allow you to include additional payload in the JSON input to your Lambda function. So if you want to make authorizations that are based on information found in the request header, query string parameters, or the body of the
request, use the REQUEST type. - When API Gateway receives the request and invokes your custom authorizer, it will include this additional request information. You can then use it as part of evaluating whether or not to authorize the request.

Cognito
- If the consumers are external developers, you probably want to look at using Lambda Authorizers or Amazon Cognito.
- You can use Amazon
Cognitoand an Amazon CognitoUser Poolto control access to your APIs. Cognito User Pools provide a set of APIs that you can integrate into your application to provide authentication. User pools are intended for mobile or web applications where you handle user registration and sign-in directly in the application. - To use an Amazon Cognito user pool with your API, you must first create an authorizer of the
COGNITO_USER_POOLSauthorizer type, and then configure an API method to use that authorizer. - After a user is authenticated against the user pool, they obtain an Open ID Connect token, or
OIDCtoken, formatted as a JSON web token. Users who have signed in to your application will have tokens provided to them by the user pool. Then that token can be used by your application to inject information into a header in subsequent API calls that you make against your API Gateway endpoint.

IAM Permissions
There are two types of IAM permissions for APIs:
Invoke Permissions:
For the execute-API permission, create
IAMpolicies that permit a specified API caller to invoke the desired API method. To apply this IAM policy on any API method, you need to configure the API method to use an authorization type of AWS_IAM. Once you have associated this authorization type with your API method, you can now allow users with this permission to invoke your API.This example grants
AllowInvoke permissions on the POST method of mydemoresource API.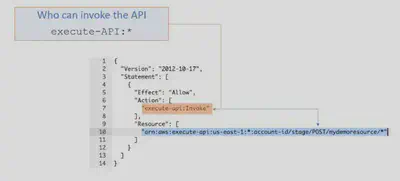
Manage Permissions:
To allow an API developer to create and manage an API in API Gateway, you need IAM permission policies that allow a specified API developer to create, update, deploy, view, or delete required API entities. To do that, create a policy using the apigateway:HTTP_VERB format, associated with the specific resource using the verb that you want to permit or deny in the policy.
In this example, the user with this policy is limited to perform the GET method requests on one of the API resources, but is permitted to take all of the actions (*) on the second resource.

Resource Policies:
In addition to an IAM policy to grant permission to a user, group, or role, you can also apply policies directly on API Gateway using a
resource policy. A resource policy is a JSON policy document that you attach to an API to limit access by users from a specified account, IP address range, VPC, or VPC endpoint.Resource policy and authentication methods(IAM, LambdaAuthorizers, Cognito) work together to grant access to your APIs. Methods for securing your APIs work in aggregate.
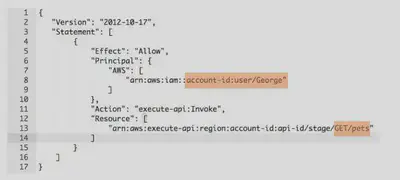
Example: Limiting Access by User
In this example, the resource policy allows a user from another AWS account (account-id:user/George) to perform GET requests on the Pets resource of our API.
Example: Limiting by IP Address
This resource policy denies any user with a source IP address in one of two specified ranges from accessing the API. This is done by specifying an effect of DENY and an IPAddress condition with an array of source IP addresses.

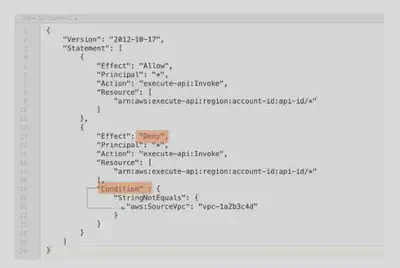
Example: Limiting by VPC
This resource policy denies anyone (indicated by the principal = *) coming from the VPC specified as the sourceVPC within the Condition.
Build an API
The basic steps for creating an API from the API Gateway console can be mapped directly to the breakdown of the invoke URL:
Create and name API

Choose the Create API option from the console. The other key selection you must make to save your API is the Endpoint type. When you save your API, AWS generates a unique ID for that API name, which becomes part of the hostname in the invoke URL.
Add Resources

Use the Actions/Create Resource option to create a resource.
You can create parent-child relationships among your resources for an API, and you can specify path parameters using curly brackets.
Configure Resource as Proxy

If you choose this option, it will automatically create a special HTTP method called “Any.” A proxy resource is expressed by a special resource path parameter of {proxy+}, often referred to as a greedy path parameter. The + sign indicates whichever child resources are appended to it.
Create Method

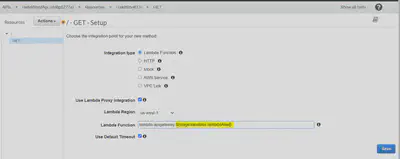
Select Create Method from the Action menu, you’ll be prompted to choose an HTTP verb. Once that’s done, you’ll be prompted to complete the other setup items, including timeout and integration type.
Depending on the integration type you select, you’ll have to provide different details.
Edit Method Details

Once you’ve saved the details of the integration type, the console will display panels that let you add to your Request/Response details. When proxy is not configured, you’ll need to configure both the integration request and the integration response, and set up necessary data mappings between the method request/response and the integration request/response.
Test your API methods

When you select the test option, you’ll be prompted for any required values and can execute your tests.
Note: Testing a method with the API Gateway console is the same as calling the method outside of the API Gateway console. Changes can’t be undone - you are really executing the method.
Integration Types
As part of creating the method you must choose an integration type. There are 5 possible options:
Lambda Functions
- When you are using API Gateway as the gateway to a Lambda function, you’ll use Lambda integration.
- The proxy option is highly recommended for integration with a Lambda function. This will result in requests being proxied to Lambda with request details available to your function handler in the event parameter, supporting a streamlined integration setup.
- When proxy is not configured, you’ll need to configure both the integration request and the integration response, and set up necessary data mappings between the method request/response and the integration request/response. If the proxy option is used, you don’t set the integration request or the integration response.
- The setup can evolve with the backend without requiring you to tear down the existing setup.
- For integrations with Lambda functions, you will need to set an
IAMrole with required permissions for API Gateway to call the backend on your behalf.
HTTP EndPoints
- HTTP integration endpoints make sense for public web applications where you want people to interact with the endpoint. This type of integration lets an API expose HTTP endpoints in the backend.
- API Gateway passes the incoming request from the client to the HTTP endpoint, and passes the outgoing response from the HTTP endpoint to the client.
AWS Services
- AWS Service as an integration type lets an API expose AWS service actions -for example you might drop a message directly into an
SQSqueue.
Mapping Templates (AWS & HTTP Integration)
- Mapping templates can be used to modify request / responses
- Rename / Modify query string parameters
- Modify body content
- Add headers
- Uses Velocity Template Language (VTL): for loop, if etc…
- Filter output results (remove unnecessary data)

For example, you might add query strings or custom header parameters to your methods, or update the integration request to map input data from the method request to the format required by the backend.
Mock
- API Gateway returns a response without sending the request to the backend.
- This is a good idea for a Health check endpoint to test your API.
- Any time you want a hardcoded response to your API call, use a
MOCKintegration.
VPC Link
- VPC Link allows you to expose VPC resources outside your VPC.
- Take an endpoint on your EC2 instance that’s not public - API Gateway can’t access it unless you use the VPC link and you have to have a Network Load Balancer on your backend.
- For an API developer, a VPC Link is functionally equivalent to an integration endpoint.
Deployment
When you are ready to make your API callable for your users, you need to deploy your API to a stage.
API Stages
When you deploy your API, you deploy to a stage. A stage is a snapshot of the API and represents a unique identifier for a version of a deployed API. Stages allows you to have multiple versions and make it easy to roll back a version. A number of the critical design options are set per Stage like for eg. Caching, Throttling and Usage Plans
At that point, a base URI is generated and displayed on the API stage editor. That base URI is called the Invoke URL, and it will look like this example.
Use Stages to Differentiate your APIs

Use different stages by environment or customer
Use stage variables to increase deployment flexibility
Use stages with canary deployments to test new versions
Best Practice: Use API Gateway Stages with Lambda Aliases like so:
In Lambda, enable versioning and use aliases to reference

In API Gateway, use stages for environments
Point API Gateway stage variables at Lambda aliases

Customize the Hostname
You can make the URL more meaningful to your users by using a custom domain name as the host and choosing a base path to map the alternative URL to your API. You will need an SSL/TLS certificate for the domain name. API Gateway is integrated with Amazon Certificate Manager (ACM) and allows you to import your own certificate or generate an SSL certificate with ACM.
Options Set per Stage
A number of the critical design options are set per Stage:
- Caching
- Throttling
- Usage Plans
- Canary
- Generate SDK
Throttling
- Account Limit: API Gateway throttles requests at 10000 rps across all API. The maximum concurrent requests is 5000 requests across all APIs within an AWS account.
- If you go over 10000 rps or 5000 concurrent requests you will receive a HTTP-429 Too Many Request error
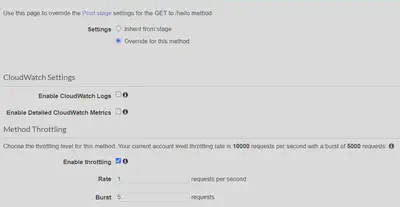
- Can set Stage limit & Method limits to improve performance
Stage-Limit
- Or you can define Usage Plans to throttle per customer
Just like Lambda Concurrency, one API that is overloaded, if not limited, can cause the other APIs to be throttled
Usage Plans and API Key
API keys and usage plans together let you create very specific plans that make sense for your business. This can be useful for things like preventing one consumer from using all of your backend system’s capacity or to ensure that your downstream systems can manage the number of requests you send through.
API Keys: With API Gateway you can create and distribute API keys to your customers. Customers include the api key via x-api-key header in requests.
Usage Plans: You can set throttle and quota limits based on API keys via the usage plans feature. You can set up usage plans for:
- API Key Throttling per second and burst
- API Key Quota by day, week, month
- API Key Usage by daily usage records
Here is an example where you might throttle with usage plans for specific types of consumers. In this case, you want to limit your mobile consumers to invoke your API at a maximum rate of 50 requests per second. While for your partners, you want to enforce a quota of 10,000 requests per day. With usage plans, you can create both the throttle rate limit and apply a daily quota.

The type and level of throttling applied to a request is dependent on all of the limits involved and are applied in this order:
- Per-client, per-method throttling limits that you set for an API stage in a usage plan.
- Per-client throttling limits that you set in a usage plan.
- Default per-method limits and individual per-method limits that you set in API stage settings.
- The account level limit.
Caching

- Caching reduces the number of calls made to the backend
- Default TTL (time to live) is 300 seconds (min: 0s, max: 3600s)
- Caches are defined per stage
- Possible to override cache settings per method
- Cache encryption option
- Cache capacity between 0.5GB to 237GB
- Cache is expensive, makes sense in production, may not make sense in dev / test
- You can invalidate an existing cache entry and reload it from the integration endpoint for individual requests.
- Clients can invalidate the cache with Cache-Control: max-age=0 (with proper IAM authorization).
- If you don’t impose an InvalidateCache policy (or choose the Require authorization check box in the console), any client can invalidate the API cache

Canary Deployments
Canary deployments allow you to send a percentage of traffic to your canary while leaving the bulk of your traffic on a known good version of your API until the new version has been verified.
It makes available a base version and updated versions of the API on the same stage (usually Prod), allowing you to introduce new features in the same environment for the base version.
To set up a canary deployment via the console, select a stage, and then select the Canary tab for that stage.

Generate an SDK
At an API stage, you can also export the API definitions or generate an SDK for your users to call the API using a supported programming language.
Enable CORS
CORS must be enabled when you receive API calls from another domain.
The OPTIONS pre-flight request must contain the following headers:
- Access-Control-Allow-Methods
- Access-Control-Allow-Headers
- Access-Control-Allow-Origin
CORS can be enabled through the console

Monitoring
With any enterprise-grade production application , you need to actively manage and understand metrics and logging associated with your APIS.
CloudWatch Metrics
API Gateway has seven metrics out of the box, and they’re all free at the stage level. While these are free at the stage level, consider the value of enabling detailed metrics so you can see these metrics at the method level. This is where you would be able to see details about gets vs. posts vs. deletes etc. You can enable detailed metrics from the Stage settings.
CacheHitCount & CacheMissCount: efficiency of the cache
Count: The total number API requests in a given period.
IntegrationLatency: The time between when API Gateway relays a request to the backend and when it receives a response from the backend.
Latency: The time between when API Gateway receives a request from a client and when it returns a response to the client. The latency includes the integration latency and other API Gateway overhead.
4xxError means Client errors
- 400: Bad Request
- 403: Access Denied, WAF filtered
- 429: Quota exceeded, Throttle
5xxError means Server errors
- 502: Bad Gateway Exception, usually for an incompatible output returned from a Lambda proxy integration backend and occasionally for out-of-order invocations due to heavy loads.
- 503: Service Unavailable Exception
- 504: Integration Failure – ex Endpoint Request Timed-out Exception API Gateway requests time out after 29 second maximum
CloudWatch Logs
In addition to CloudWatch Metrics, you can also learn a lot from CloudWatch Logs about how your APIs are performing. API Gateway has two types of CloudWatch logs built in.
Execution Logs:
- Enable CloudWatch logging at the Stage level (with Log Level). Two levels of logging, error, and info
- Optionally log method request/body content
- Set globally in stage, or override per method
Access Logs:
- Details about who accessed your API: IP, HttpMethod, User, Protocol, Time
- Customizable format for machine parsable logs
X-Ray
AWS X-Ray gives you an end-to-end view of an entire request, so you can analyze latencies in your APIs and their backend services.
- Analyze latencies in your APIs and their backend services
- Configure sampling rules to focus on specific requests
CloudTrail
AWS CloudTrail captures all API calls for API Gateway as events, including calls from the API Gateway console and from code calls to the API Gateway APIs.
- Includes IP address, requester, time of request
- Review event history
- Create a trail to send events to an S3 bucket